I finished some new modifications to my cb360 cam bearing setup and am reinstalling the head on the engine. I like to have my workspace set up as neatly as possible, it keeps things clean and speeds up the process. When I'm done using a tool, it goes back on the wall instead of the bench, it's actually quicker to work this way than to keep a few wrenches laying around on the table.
I like to have the parts I need already sorted before beginning work, that way I know if I'm missing anything before I have to go hunting through an engine looking for a part that may not have been there in the first place.
Clean parts make a job easier too, it's a lot easier to manipulate a clean part than one coated in grease. I use some long tweezers to get the valve retainers in too.
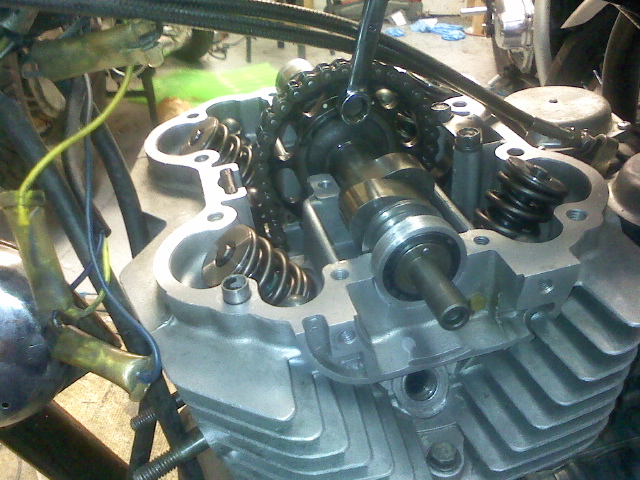
Once the valves are installed, I double checked the cam fit. You can see the needle bearings, as well as the needle thrust bearings installed on the cam.
Installing the head is a job best done carefully, the copper head gasket must be prepared carefully, first spraying copper sealant on both sides, and cleaning both mating surfaces with MEK before laying the gasket on. You can see the modified oil seal on the points side of the cam as well. Applying some lok-tite to the cam sprocket bolts is necessary when working with a slotted cam.
Degreeing the cam is simple with the tool I made from an old cb360 head. The tool holds the #1 intake rocker arm in place while setting the cam and crank offset. It's an important step on a built engine to set the cam properly in relation to the crank, 1 degree of offset can really change the performance characteristics of an engine.
This shows how easy using my tool is to change the cam offset without removing the valve cover. I'm using some vise grips to move the cam in relation to the sprocket after lightly loosening the sprocket bolts. The cam was set back to stock specs, but had to be slotted to compensate for the removal of the base gasket to increase compression. I will be using the stock cam timing as a base for reference, and will be able to change cam timing to both adjust for cam chain stretch and to experiment with changing torque vs rpm characteristics.


Degreeing the cam?? I thought you simply have the "L" at the top, when at LT on crank.?
ReplyDeletemilling the head and decreasing the distance of the cam to the crank retards the timing requiring an adjustment of the cam gear to acquire appropriate timing
ReplyDeletehow did you seal the right hand side of the camshaft
ReplyDelete