Showing posts with label metalworking. Show all posts
Showing posts with label metalworking. Show all posts
Thursday, September 19, 2013


Wednesday, September 18, 2013
Handmade alloy cafe racer tank
I use something called a tuck shrinker to shrink edges, some people like to use an an edge shrinker, but hammering a tuck more effectively shrinks than a mechanical shrinker. Stretching the center is done with a hammer and shotbag. Lots of people new to metalworking are under the impression that the english wheel is the workhorse of the shop, but most of the shaping is actually done with the first two tools. The wheel is really a finishing and fine shaping tool.
I'm using a wooden buck I made years ago for this tank, since then I usually make a foam buck because it's not really necessary to have something as sturdy as wood when you're just using it as a shape reference. Wood is certainly nice when you need to clamp panels in really complex shapes or where really critical accuracy is required, but for most alloy tanks, getting things within half an inch or so is perfectly fine.
Monday, September 9, 2013
Building an alloy Manx tank
Going to do a little writeup on building an aluminum tank, recently I took some in process photos as I built a manx tank for a customer's cx500 cafe racer.

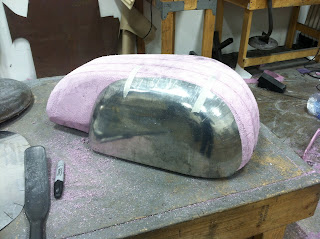

First I like to start with a pattern, foam is fine to use as a template, especially when it doesn't require an exact copy, but you're just working out a shape. It helps to figure out mounting and clearance issues with the bike before banging out any metal too.

Depending on your style, you can start forming any part of the tank first, I usually like to start the sides on manx types first, because the top is mostly flat and a lot simpler. I like to be able to put each side next to each other to guarantee symmetry.
Since the pics were just in progress pics, I'll detail more of the actual forming process in the next few days' posts.
Thursday, August 29, 2013
DIY Cables
Every now and again I take in service work, often it's fixing "cafe racer" builds which were put together with little consideration or craftsmanship and promptly sold. One of the most common and annoying things I see on these is dropped handlebars with stock length cables, usually by the time they end up in my shop, the cables have either broken or are sticking because they're kinked at some ridiculous angle and have worn through the sheathing.


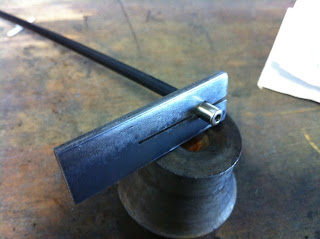


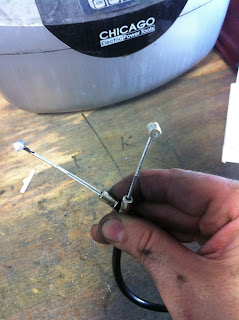

With just a little patience and a few dollars in parts, any garage builder can make or modify an existing cable to the proper length, preventing the problems that come with poorly routed cables and too much or too little slack. I usually use a special tool I made for crimping the cable housing ends, but in this demo, I'm going to use a really simple tool I made when I very first started fixing bikes.

Nothing in this post is especially expensive, and the only thing that really can't be found locally are the cable parts themselves, however, the cable ends, sheathing, sheathing ends and cable itself can be purchased online through motion pro's website. If you're shortening an existing cable, you really only need purchase the housing end, and the cable end.

The first step is to establish the length of the housing, then cut it to length and clean up the ends, I like to use a drill bit to pick out the scraps of the nylon sheath that like to get stuck inside when you cut it. Then pop on the ends, and using a really simple tool, you can stake the end to the housing so it'll never come off.

Then establish the length of the cable itself, if there are any adjusters in the line, I like to move those to fully tight and make the cable a touch on the long side. The ends for the cable can be purchased online, or can be made with a drill press and file, I make mine from brass on the lathe, but if I did a lot of cables I'd certainly buy a cable end assortment.

I keep some silver solder in my solder pot, which is just a scrap stainless part with a cap welded to the end, I find that if you don't have any tools to make something like this, a stainless measuring cup works just fine! Some plumbing flux and a blowtorch are the only other tools you'll need. Just put the ends on the cable, flux it, smoosh the end of the wire so it frays and won't easily slip back through, and dip in the hot solder pot. The flux, if done right, wicks the solder all the way through and around the cable end, ensuring a really good solid bond.
After some cleanup on the grinder, or with a hand file, the cable is ready to go, no more shotty cables on your cafe racer!


Monday, July 16, 2012
Making an aluminum cafe racer seat
I sometimes get the feeling that people who are into custom metalwork for their bikes or cars either think that making those parts is either extremely easy (I saw Jessie James build that tank with his English wheel!), or some sort of black magic. It's really neither, TV simplifies things too much, but working with sheet metal isn't anything more than a trade that isn't very common anymore, there's no magic to it at all. So I'm not revealing any secrets by showing how to make a pretty simple part, just doing a bit to preserve an old school skill.
So here's the step by step.

First I cut out a blank from some 14ga aluminum, I've worked out the shape over the years so I can make a seat just about the same size every time without having to trim much off at the end.

A cafe seat is typically just a hemisphere, which is really just a simple compound curve, there's a curve along the axis of the seat, and across the axis, a fender is really the same type of shape, just with one curve having a larger radius than the other!

To start forming the sheet, the middle needs to be stretched out, stretching the metal makes it thinner, so it takes up more surface area, if its edges can't move, it has to pop out, so that's how you "dome" metal.

Since I don't want to only stretch the metal (it would get really stupidly thin if I did), I shrink the edges to bring out the doming of the middle more. Shrinking actually makes the metal thicker, so it takes up less surface area, and tends to tuck in, so it pops any doming done to the sheet.

Shrinking is done by creating tucks at the edges, and then hammering them against an anvil, because of the shape of the tuck, the hammering actually gathers the metal together making it thicker, cool huh!

I use the English wheel mostly for small amounts of metal moving, it's a great tool for a specific job, it can dome metal, but not as fast as hammering, and it can't really shrink. It's this that makes me chuckle a little when some TV show shows some metals guy making a tank (but only shows them using the wheel!).

When the blank is shrunk and stretched a lot, it really needs to be wheeled to give it a smooth surface again, otherwise it's not really possible to keep stretching and shrinking efficiently.

This would be a rough wheeling, there's not much focus on getting a really nice planished finish, but just to bring the surface into some regularity. After this, the blank goes on to more shrinking and stretching, you can really see how much things can move!

After a few rounds of back and forth between the tuck shrinker, wheel and shotbag, I switch over to a larger radius anvil for the wheel (as close to the natural radius of the blank as you can get without going larger). It's with this setup and a constant light pressure that I planish the blank, it takes a lot of finesse and practice to get the blank really smooth and straight.

Now that the blank is formed, it's on to trimming to shape and building the rest of the seat! -I'll be posting that next.
Subscribe to:
Posts (Atom)