Saturday, January 29, 2011

XS MANX

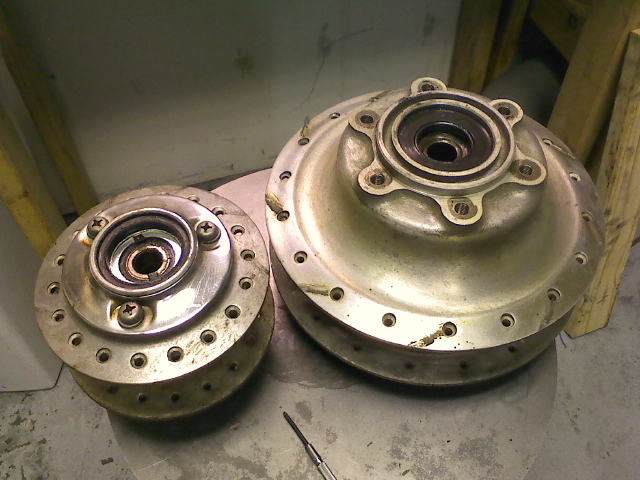
We got the tires off the old rims, and bought a Borrani 18" rim for the front wheel, along with stainless spokes to lace both 18" rims to the hubs.  An order of needed engine parts will come in this week, so the engine can be buttoned up better than new. 

The spokes were removed and the hubs will be polished and lightened where needed, the rear drum may or may not end up being resurfaced.  The front wheel and hub are fairly light and strong, and the Ducati rotor being used on the front end won't add much to the unsprung weight either, which will be good.  The back wheel assembly however, was awfully heavy and is going to make the back end suspension a touchy subject.  I took apart the assembly and decided I could start to shed some weight at the axle.  So I decided to make the axle again in titanium, as I still have about 20 feet left from a surplus find.

Titanium isn't much fun to machine, especially with a very old lathe, and no steady rest either.  The amount I could take off per pass was really limited by the need to keep the piece from flexing, so about an hour and a half after starting, I was doing my finishing passes.  Without the steady rest, I had to divide up the shaft and manually compensate for the remaining flex in the piece.  Not too bad really, wound up with an axle +/- .001 over the length, plenty precise for this old beast.  And it saved 10oz over the stock steel shaft, and is stronger too.


Monday, January 17, 2011

Building the XS Manx

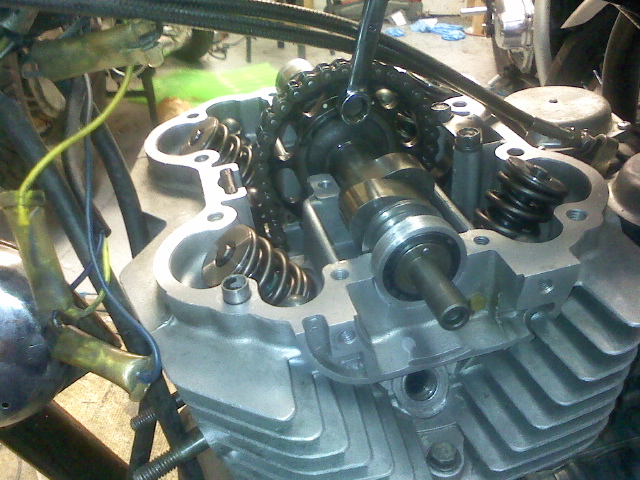
Despite getting the business end of a screwdriver in his eye last week, Toby is back at the 650 engine, which is certainly a well engineered piece of metal.  The cam came out with little trouble, the manual specs a chain breaker to split the cam chain and extract the cam, but he managed to remove the end bearings and find enough wiggle room to get it out with ease.  The frame continues to shed weight, another hour of grinding left me with a pile of dust and useless crap to clean up, better on the floor than on the bike in my opinion, useless weight has no place on a real cafe racer.  We're planning on swapping the front forks for a set of larger XJ1100 units, the top and bottom triple clamps will be machined after we mock up the bike to measure some of the critical geometry.  The trees will likely be built with an eccentric adjustment for fork offset, to allow some fine tuning once the bike is on the road.  I'll likely be machining some cartridge emulators and building them into the fork damping system too, there's no reason to leave better roadholding out of the equation.


Wednesday, January 12, 2011

Building the XS Manx

This will be the story of the transformation of a cruddy old '83 XS 650 into a custom Norton Manx style roadracer.  My friend Toby Zeigler, a professional mechanic and excellent engine builder, and I have teamed up to complete this build.  With our unique skill sets, we'll have a machine that runs and handles better than it did the day it came from the factory, and looks as good as it performs.  This bike will be built to sell to a worthy buyer when completed, and we hope to be finished before the riding season really kicks in.  Of course we'll have it in ridable shape by the time the weather gets just warm enough to do a few hundred miles of shakedown rides before stripping the bike again for final polishing and powdercoating, etc.

We spent Monday afternoon getting all the extra junk off the bike and removing the engine for a complete professional overhaul.  Once apart, I realized just how ugly the stock frame is...


Sunday, October 17, 2010

rebuilding the cb360 phoenix engine

 I finished some new modifications to my cb360 cam bearing setup and am reinstalling the head on the engine.  I like to have my workspace set up as neatly as possible, it keeps things clean and speeds up the process.  When I'm done using a tool, it goes back on the wall instead of the bench, it's actually quicker to work this way than to keep a few wrenches laying around on the table.
 I like to have the parts I need already sorted before beginning work, that way I know if I'm missing anything before I have to go hunting through an engine looking for a part that may not have been there in the first place.
 Clean parts make a job easier too, it's a lot easier to manipulate a clean part than one coated in grease.  I use some long tweezers to get the valve retainers in too.
 Once the valves are installed, I double checked the cam fit.  You can see the needle bearings, as well as the needle thrust bearings installed on the cam.
 Installing the head is a job best done carefully, the copper head gasket must be prepared carefully, first spraying copper sealant on both sides, and cleaning both mating surfaces with MEK before laying the gasket on.  You can see the modified oil seal on the points side of the cam as well.  Applying some lok-tite to the cam sprocket bolts is necessary when working with a slotted cam.
 Degreeing the cam is simple with the tool I made from an old cb360 head.  The tool holds the #1 intake rocker arm in place while setting the cam and crank offset.  It's an important step on a built engine to set the cam properly in relation to the crank, 1 degree of offset can really change the performance characteristics of an engine.
This shows how easy using my tool is to change the cam offset without removing the valve cover.  I'm using some vise grips to move the cam in relation to the sprocket after lightly loosening the sprocket bolts. The cam was set back to stock specs, but had to be slotted to compensate for the removal of the base gasket to increase compression.  I will be using the stock cam timing as a base for reference, and will be able to change cam timing to both adjust for cam chain stretch and to experiment with changing torque vs rpm characteristics.

Wednesday, October 13, 2010

new idea for my alloy seats

I thought it might be interesting to show some progress I've been making on a seat and tank for a customer's 550.  I usually mount seats with screws to go to the frame directly, but sometimes it's nice to have a seat you can lift up to access the battery or electrical box etc.
 I found some parts at the hardware store and came up with an idea to make this easy for my customer.  I used a stainless hinge at the front of the seat, and some push in rubber bumpers to rest the seat on the frame.
 The rubber bumpers keep the alloy seat from vibrating and rubbing the powdercoat off the frame.  The seat pad is made separately and secured to the alloy base with velcro.  I make all my seats this way so if recovering the seat is ever needed, it's an easy job.  The look is cleaner too.  I just hate snaps.
 The seat hinges at the front, and for the back I imagined some kind of latch would be good.  I didn't want my customer to have to reach up under the seat to unscrew anything to lift the seat up, so I found a cabinet latch that latches under a given pressure.
Now the seat can be lifted up to access underneath, and setting it down and pressing it into the latch secures it for riding.  Lifting the seat up with enough pressure releases the latch and lets you hinge it up again.  I'm definitely going to be doing my seats like this as much as I can now!

Wednesday, October 6, 2010

handcrafting an alloy fender


 I built a fender for a customer today, so I decided to post some progress pictures to help out those who are trying to get into metalworking.  First I start with an annealed aluminum blank, with a centerline and two sidelines 1" away from each side.
Start hammering along the centerline to stretch that section of the metal and start developing both radii of the fender.  A fender is a good part to learn because it has two separate curves to it, a major curve along the tire, and the minor curve around the profile of the tire.
 Using a dolly and soft slapper, bring the sides in, which will flatten the folds developed in the hammering and begin to shrink the sides.
 Go back to hammering the center to keep developing the crown of the fender, at this point, you can move gradually out to the side lines with the hammering, blending the force as you go out.  The sides will continue to fold, and this is a good thing, as you want the sides to shrink as you stretch the center.
Back on the dolly, bring the sides flat again, and this will gradually shrink the sides and start smoothing the piece.
 Now's a good point to check your work against your "template" here I am just using the type tire the customer has.  You want to leave the fender a little flat at this point because the english wheel will stretch the middle more, developing the major radius a bit further.
 Using a steel slapper, work out most of the hammer marks, and check for straightness of the part by sighting down the centerline.  Use the sidelines to check the minor radius for symmetry.
 Using the english wheel and a 12" radius die, roll the fender lengthwise, which will even out the part.  You're not moving much metal here, just smoothing out the hammer marks and giving the surface a smoother finish.
Continue checking your work to make sure you don't put too much crown on the fender, it's hard to shrink metal and much easier to stretch, don't go to far.
Using the steel slapper and dolly, the sides can be planished and straightened, as the sides are brought straighter, the fender will lose some crown, so check against your template as you're working.
After sanding, you can begin polishing with a heavy wheel like sissal or my favorite, a finger buff.  A hard cutting compound is a good choice.  Work in one direction only at this point.  When moving to a softer wheel, work in a perpendicular direction, this will help you see your progress and eliminate the bigger marks from the tougher compound.

1971 CB350 Cafe

The next project in the shop is rebuilding a 1971 CB350 into a true biz cafe racer for a customer.  We agreed on a look for the bike, and the work began.  The first thing I did was to build a stainless 2-1 exhaust while I had the bike together.  The bike was in fairly rough shape when purchased, though the body work looked alright, the tires were flat, shocks were mush and tank was full of kreem covered rust!


I got the bike up on a stand and waited until I had some time to work on it, then I stripped everything off that wasn't going to be part of the completed bike or wasn't in good enough shape to keep.


Before doing any body work, I decided it might be a good idea to go through the engine and do a thorough reconditioning, along with replacing any parts that were worn past service limits.  Pulling the engine was very easy, once I removed the mounting bolts, the motor lifted right out of the frame.  

The engine turned out to be pretty rough too.  When we changed the oil after getting the bike, we cleaned a mess of metal shavings and chips from the oil filter (not a good sign).  Assuming it was probably a chewed up tensioner, we hoped for the best.  Turns out the engine was chewing itself to bits and the previous owner probably thrashed the hell out of this bike.  Going through the top end, I discovered the cam was badly pitted on the lobes, the rocker arms were also ground down due to the pitted cam, the cam chain was stretched probably because of the added friction, the tensioner was indeed chewed to bits.  When I got the head off, the condition was less bad, the valve seats looked serviceable, though one of the exhaust valves was too pitted to get a cup on for lapping.  
One of the combustion chambers also showed some damage from what might have been a foreign object, but the valve seats weren't impacted, so the piston and head could still be used.  Looking at the cylinders, I thought they were serviceable, until I did a hone and discovered some deep scoring that will require at least a .25mm overbore and piston kit to match.  


Cleaning up the parts was pretty simple, and facing the mating surfaces will ensure a good seal and proper reassembly.  Once replacement parts are approved by the customer, rebuilding can proceed.  The good news is basic inspection of the bottom end showed splitting the cases will probably not be necessary.  And my advice is to replace the cam chain with a heavy duty type with a rivet master link so the chain can be upgraded without splitting the crankcase and involving that much more work.