Invariably, yes, it is cheaper and easier to buy a ready made seat, and frankly, the only reason you should do it this way is if you want your own style, or are a serious massochist.
The first thing you need is tools, shown here are a can of spray adhesive, a flexible tape measure (used more as a contour gauge than a ruler), coping saw, small drywall saw, rasp, contouring sanding block, ruler, xacto, tape measure and some pens.
And the first step is DRAW THE DAMNED THING! If you're one of those youtube generation kids, you've stopped reading by now and are just scrolling through the pics, so have fun with that. If you're still tuned in though, drawing the thing is the first step to a good design, sit on it for a day or two as well, you'll be amazed how many changes you make because of things you didn't consider, and how many changes you'll wish you made if you just start slogging fiberglass at something without thinking.
When you're really happy with the design, print it full scale, or if you drew it full scale, use it to trace out negative templates, these will guide you and help keep your part symmetrical. I like to use melamine from the hardware store, but chipboard or scrap boxes work too, just a bit flimsier.
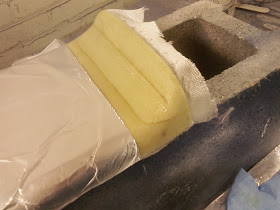
As far as materials, I use urethane foam from the hardware store (it's the yellow stuff, not the pink or blue). The reason for this is that it's easy to carve and doesn't dissolve in contact with fiberglass. Most of the videos you see on how to do this tell you to cover your foam in plastic and mold release it. This is absolutely the worst thing to do, you want your fiberglass to stick to and follow the shape of your foam, not lay on top and slide down the sides because of the plastic and release agent. When you're done with the seat, you don't pop it off your foam anyway, you tear the foam out with the back of a claw hammer, you're done with it, there's no point in trying to save it.
Here's where your guides come in, you can use them to rough in the shape as you stack up the foam layers, then use them to guide your rasping and sanding to finish the shape.
Final carving has to be done carefully, because the final foam form is what determines your end shape, if the foam isn't straight, or smooth, then you're boned. The only way you'll recover from that is by grinding massive high spots down through the foam, reglassing, grinding again, and adding massive amounts of bondo to the low spots and adding a ton of weight and time in sanding. 99% of the fiberglass seat diy builds I see skip the step of getting the foam really smooth and straight, and go straight to slogging fiberglass. Then with the magic of editing, they turn 28 hours of sanding, grinding, rebondoing and swearing into a minute's worth of "finish work". Balls I say... this is how you really do it.
The next step, once you're absolutely positively sure your foam is good, is to begin glassing. You don't start glassing with mat, or cloth, or whatever, you start with surfacing veil, the really fine thin stuff that barely adds any thickness to the part. The reason is because you first want to create a nice shell surface to add thicker stuff to, a shell that will help thicker stuff stick and keep you from distorting the foam underneath as you apply the main glass layers.
once you've got a layer on, there are usually a few spots that don't stick all the way, so sand down the whole part to knock those off, and apply a second layer of veil, the second layer will lay down perfectly now.
And now onto a tacky but hard second layer of veil, you start applying your cloth. I don't like building one-off's with mat because it really doesn't lay down in a consistent thickness, doing it with cloth will save you hours in finishing time. A critical step is to really carefully plan how you trim your cloth, make sure it doesn't fold over anywhere, and where you overlap pieces, make sure the next layer skips the overlap, that way you're not creating any high spots that you'll have to grind off later.
If there are any areas that don't want to lay down, use some tin foil to hold them to the part, it peels off easily once the glass is cured and will keep you from having to spend more time grinding out bubbles and reglassing.
now that you've got a glassed part, hit it with the sander to knock down any high spots or burrs, and apply a SKIN coat of bondo, a skin coat is basically running the squeegee across the surface so the filler only fills the low spots, there should still be spots of fiberglass visible, and that's okay because your glass conforms properly to the foam model.
Once the bondo is cured, hit it with the sander again, you'll see a mix of glass and bondo on the surface, and that's fine, then apply another skin coat, this time use the curve of the squeegee to match the surface of the part, and do your best to make a consistent thickness layer of filler over the whole part (like, 1/32", not 1/4"). Hit the second layer with the sander again and if you've done things right, you'll wind up with a straight smooth part, strong and light.
I personally use Duratec surfacing primer next, it's essentially a gelcoat but has better sanding properties, spray the whole part evenly, you can use a cheapo HF spray gun to do it. The part should have a very light ripple, the stuff never lays completely smooth, but the ripple can then be sanded out with a sanding block and some 220 paper.
Any spots that are still low after the sanding can be skinned with filler, as they're probably only a hair's width below regular surface. Now you're ready to remove the foam, mount up the seat and prime&paint.


